Embryo Transfer
The following are the different technologies used in IVF. They are in no particular order or are not limited to the ones mentioned.
procedures. It involves the placement of fertilized embryos into the uterus of a woman with the goal of establishing a successful pregnancy. Here is a detailed description of the embryo transfer process:
Fertilization and Embryo Culture:
– The process begins with the retrieval of eggs from the woman’s ovaries through a procedure known as egg retrieval or oocyte aspiration.
– These eggs are then fertilized with sperm in a laboratory dish, creating embryos.
– The embryos are cultured in a special incubator for a specific period, allowing them to develop and reach a certain stage of maturity.
2. Embryo Grading:
– Embryos are assessed and graded based on their quality and developmental stage.
– Grading involves evaluating factors such as the number of cells, cell symmetry, and the appearance of the embryo.
3. Timing of Embryo Transfer:
– The timing of the embryo transfer is crucial and is often determined based on the stage of embryo development.
– Commonly, embryo transfers are performed on day 3 or day 5 after fertilization.
4. Preparation of the Uterine Lining:
– Prior to embryo transfer, the woman may undergo hormonal treatments to prepare her uterine lining for implantation.
– The goal is to create an optimal environment for the embryos to implant successfully.
5. Embryo Transfer Procedure:
– The actual embryo transfer is a relatively simple and quick procedure.
– The woman lies on an examination table, similar to a pelvic exam, with her legs in stirrups.
– A speculum is inserted into the vagina to visualize the cervix.
– Using a thin, flexible catheter, the embryologist or fertility specialist gently introduces the embryos into the uterus through the cervix.
6. Ultrasound Guidance:
– In some cases, ultrasound guidance may be used during the transfer to ensure precise placement of the embryos within the uterine cavity.
7. Number of Embryos Transferred:
– The number of embryos transferred depends on various factors, including the woman’s age, the quality of the embryos, and the specific recommendations of the fertility clinic.
– The goal is to maximize the chances of a successful pregnancy while minimizing the risk of multiple pregnancies.
8. Post-Transfer Care:
– After the procedure, the woman is usually advised to rest for a short period before resuming normal activities.
– Some clinics may recommend additional measures, such as bed rest or restrictions on certain activities.
9. Pregnancy Test and Follow-up:
– A pregnancy test is typically performed about two weeks after the embryo transfer to determine if implantation has occurred.
– If the test is positive, the woman will undergo further monitoring to ensure the viability of the pregnancy.
Embryo transfer is a pivotal step in the IVF process, and the success of the procedure depends on various factors, including the quality of the embryos, the woman’s reproductive health, and the expertise of the fertility clinic.
ICSI
 Intracytoplasmic Sperm Injection (ICSI) is an advanced assisted reproductive technology (ART) procedure used in the treatment of infertility. It is a technique that involves the direct injection of a single sperm cell into the cytoplasm of an egg to facilitate fertilization. ICSI is often employed when traditional in vitro fertilization (IVF) techniques may not be effective due to issues with sperm quality or other fertilization challenges.
Here is a detailed description of the ICSI procedure:
1. Ovarian Stimulation: The process typically begins with ovarian stimulation, where the woman is given fertility medications to stimulate the ovaries to produce multiple eggs. Monitoring is done through blood tests and ultrasound to determine the optimal time for egg retrieval.
2. Egg Retrieval: When the eggs are mature, a minor surgical procedure known as follicular aspiration or egg retrieval is performed. This involves using a thin needle to extract the mature eggs from the woman’s ovaries. The eggs are then placed in a culture medium.
3. Sperm Collection: On the same day as egg retrieval, a sperm sample is collected from the male partner or a sperm donor. The sperm is processed to isolate the most viable and motile sperm cells.
4. Microinjection: In the ICSI procedure, a single sperm cell is selected and immobilized using a specialized microscope. A micropipette, a very fine glass needle, is then used to pick up the selected sperm cell and inject it directly into the cytoplasm of a mature egg.
5. Culture and Observation: After the microinjection, the fertilized eggs (embryos) are cultured in a controlled environment for a few days. The embryologist monitors their development and assesses their quality.
6. Embryo Transfer: Typically, one or more healthy embryos are selected for transfer into the woman’s uterus. The number of embryos transferred depends on various factors, including the woman’s age and medical history. Any additional high-quality embryos may be cryopreserved for future use.
7. Pregnancy Testing: About 10 to 14 days after the embryo transfer, a pregnancy test is performed to determine whether the procedure was successful.
ICSI is a highly effective technique for overcoming male infertility issues, such as low sperm count, poor sperm motility, or abnormal sperm morphology. It is also used in cases where previous IVF attempts have failed, or when there are concerns about fertilization success. While ICSI increases the chances of fertilization, it does not guarantee a successful pregnancy, as other factors such as embryo quality and the health of the uterus also play crucial roles.
Assisted Hatching
 Assisted hatching is a laboratory technique used in assisted reproductive technology (ART) procedures, particularly in vitro fertilization (IVF). The goal of assisted hatching is to facilitate the embryo’s implantation into the uterine lining by creating a small opening or thinning the outer shell (zona pellucida) of the embryo.
Here’s a detailed description of the assisted hatching procedure:
1. Embryo Culture: After the process of fertilization in the IVF laboratory, embryos are cultured in a controlled environment for a specific period, usually around 3 to 5 days. During this time, the embryos undergo several cell divisions and develop into blastocysts.
2. Selection of Embryos: Not all embryos created during the IVF process are suitable for assisted hatching. Embryologists carefully assess the quality of the embryos based on factors such as the number of cells, symmetry, and overall appearance. Only embryos with the highest potential for implantation are considered for assisted hatching.
3. Zona Pellucida Puncture: The zona pellucida is a glycoprotein shell that surrounds the embryo. Assisted hatching involves making a small hole or thinning a specific area of the zona pellucida. There are different methods for assisted hatching, including chemical, mechanical, or laser-assisted techniques.
– Chemical Assisted Hatching: This method involves the application of a weak acid or enzyme to dissolve a small part of the zona pellucida.
– Mechanical Assisted Hatching: In this approach, a micropipette or a specialized tool is used to create a small opening or thinning in the zona pellucida.
– Laser-Assisted Hatching: A focused laser beam is used to precisely thin or open a small area of the zona pellucida. This method is highly precise and is commonly used in modern IVF laboratories.
4. Quality Control: After the assisted hatching procedure, embryologists carefully examine the embryos to ensure that the manipulation did not negatively impact their viability or development.
5. Embryo Transfer: Once the assisted hatching is completed, the selected embryos are ready for transfer into the woman’s uterus. The embryos are typically transferred into the uterine cavity via a thin catheter, and the hope is that the modified zona pellucida will enhance the embryo’s ability to implant into the uterine lining.
Assisted hatching is usually recommended in specific cases, such as for older women, couples with a history of failed IVF attempts, or when the zona pellucida appears to be unusually thick. However, it’s worth noting that the effectiveness of assisted hatching is still a subject of ongoing research, and not all fertility clinics routinely offer this procedure. The decision to use assisted hatching is made based on individual patient characteristics and the assessment of the embryologist.
Cryopreservation is a crucial technique in in vitro fertilization (IVF) that involves freezing and storing embryos, sperm, or eggs for future use. This process allows individuals or couples undergoing fertility treatment to preserve reproductive cells and embryos for later use, often to increase the chances of a successful pregnancy.
Here’s a detailed description of cryopreservation in IVF:
1. Selection of Gametes or Embryos:
– The process typically begins with the selection of viable embryos, sperm, or eggs during an IVF cycle. These reproductive cells are carefully examined for quality and development.
2. Cryoprotectant Solution:
– Before freezing, the chosen cells or embryos are treated with a cryoprotectant solution. This solution contains chemicals that help protect the cells from damage caused by ice crystal formation during the freezing process. The cryoprotectant prevents the formation of ice crystals that can damage the cellular structure.
3. Cooling Process:
– The cells are gradually cooled to very low temperatures, usually below -130°C (-202°F). The slow cooling process is critical to preventing ice crystal formation and ensuring that the cells remain viable after thawing.
4. Storage in Liquid Nitrogen:
– Once cooled, the cells or embryos are transferred to containers and stored in liquid nitrogen at ultra-low temperatures. Liquid nitrogen is commonly used because it maintains a stable and extremely low temperature, preventing any metabolic or cellular activities that could lead to cell deterioration.
5. Long-Term Storage:
– Cryopreserved embryos, sperm, or eggs can be stored for an extended period, often years. This allows individuals or couples to delay embryo transfer or attempt additional cycles without the need for repeated ovarian stimulation and egg retrieval.
6. Thawing Process:
– When individuals or couples are ready to use the cryopreserved cells or embryos, they undergo a thawing process. The cryoprotectant is gradually removed, and the cells are warmed to body temperature.
7. Transfer or Insemination:
– Thawed embryos can be transferred into the woman’s uterus during a subsequent IVF cycle. Thawed sperm can be used for insemination, and thawed eggs can be fertilized using sperm through intracytoplasmic sperm injection (ICSI).
8. Success Rates:
– Cryopreservation has become a standard practice in IVF, and the success rates of frozen embryo transfers are comparable to fresh transfers. It also allows for more flexibility in the timing of embryo transfers, making it easier to synchronize with the woman’s menstrual cycle and optimize the chances of a successful pregnancy.
Cryopreservation has revolutionized assisted reproductive technologies by providing individuals and couples with more options and flexibility in family planning. It has significantly contributed to the success of IVF treatments by increasing the chances of achieving a healthy pregnancy.

Preimplantation Genetic Testing (PGT) is a set of laboratory techniques used during in vitro fertilization (IVF) to assess the genetic health of embryos before they are implanted into the uterus. The primary goal of PGT is to identify genetic abnormalities, chromosomal disorders, or specific genetic conditions in embryos, allowing the selection of embryos with a higher likelihood of developing into healthy pregnancies.
There are three main types of Preimplantation Genetic Testing:
1. PGT-A (Aneuploidy Screening):
– Aneuploidy refers to an abnormal number of chromosomes in an embryo, which can lead to conditions like Down syndrome, Turner syndrome, or miscarriage.
– PGT-A is performed to identify embryos with the correct number of chromosomes (euploid embryos).
– The testing involves the biopsy of a few cells from the outer layer of the embryo, called the trophectoderm, typically on the fifth or sixth day of development.
2. PGT-M (Monogenic/Single Gene Disorders):
– PGT-M is used to identify specific genetic disorders caused by mutations in a single gene, such as cystic fibrosis or sickle cell anemia.
– A small number of cells are removed from the embryo, usually on day three of development, and tested for the presence or absence of the specific genetic mutation.
3. PGT-SR (Structural Rearrangements):
– PGT-SR is employed when one or both parents have a known structural chromosomal rearrangement, such as translocations or inversions.
– It helps identify embryos with balanced chromosomal arrangements, reducing the risk of miscarriage or the birth of a child with chromosomal abnormalities.
The general process of Preimplantation Genetic Testing involves several key steps:
1. Ovarian Stimulation and Egg Retrieval:
– The woman undergoes ovarian stimulation to produce multiple eggs, which are then retrieved through a minor surgical procedure.
2. In Vitro Fertilization (IVF):
– Eggs are fertilized with sperm in a laboratory setting, creating embryos.
3. Embryo Culture:
– Embryos are cultured in an incubator for several days until they reach a suitable developmental stage for biopsy.
4. Embryo Biopsy:
– For PGT-A, cells are taken from the trophectoderm (outer layer) of the embryo, usually on day five or six.
– For PGT-M and PGT-SR, cells may be taken on day three.
5. Genetic Testing:
– The biopsied cells undergo genetic analysis to determine the genetic makeup of the embryos.
6. Selection of Healthy Embryos:
– Based on the genetic testing results, only embryos without identified genetic abnormalities are selected for transfer.
7. Embryo Transfer:
– Selected embryos are transferred into the woman’s uterus.
8. Cryopreservation (Optional):
– Any additional viable embryos may be frozen for future use.
Preimplantation Genetic Testing is a powerful tool that can increase the chances of a successful pregnancy for couples undergoing IVF, particularly for those at risk of passing on genetic disorders or experiencing recurrent miscarriages. However, it is important to note that PGT is not without limitations, and it is not a guarantee of a healthy pregnancy. Additionally, ethical considerations surround the use of PGT, and discussions about its implementation often involve careful consideration of various factors.
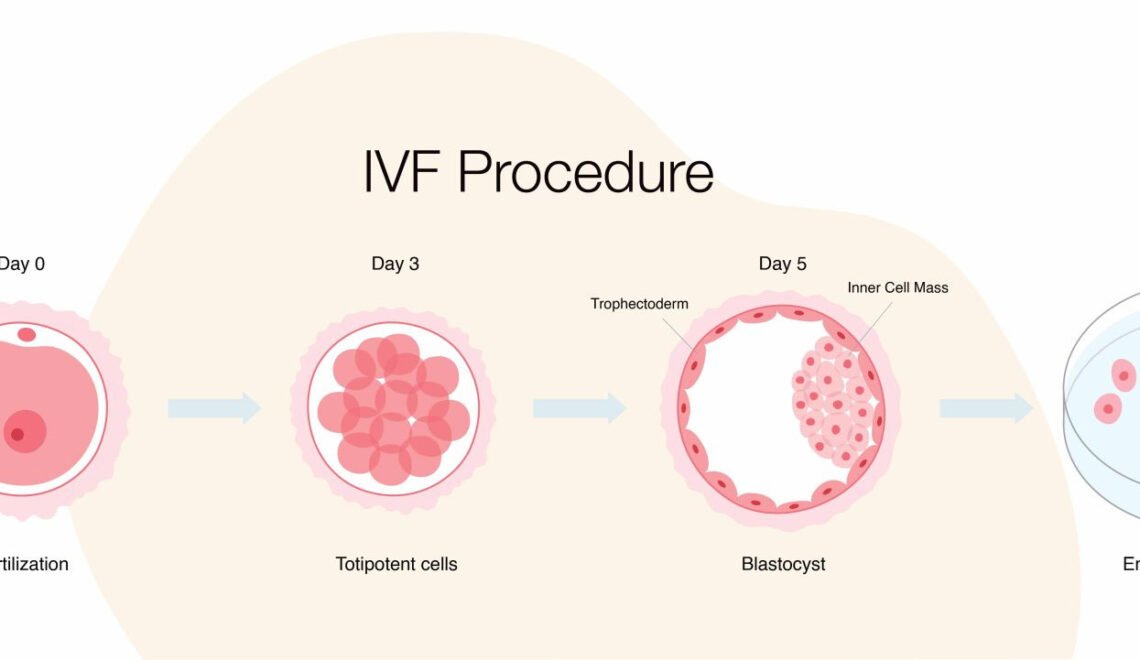
Blastocyst
A blastocyst is a stage in the early development of embryos, and it plays a crucial role in in vitro fertilization (IVF). In natural conception, after fertilization of an egg by sperm, the zygote undergoes multiple cell divisions to form a blastocyst. This process typically occurs within the fallopian tubes before the blastocyst travels to the uterus for implantation.
In IVF, the development of the blastocyst is closely monitored in the laboratory before it is transferred into the woman’s uterus. Here is a detailed description of the blastocyst stage in the context of IVF:
- Fertilization:
– IVF begins with the retrieval of eggs (oocytes) from the woman’s ovaries. These eggs are then fertilized with sperm in a controlled environment in the laboratory.
- Cleavage Stage:
– After fertilization, the zygote undergoes a series of cell divisions known as cleavage. The resulting cells are called blastomeres. During the first few days, the embryo remains a compact ball of cells.
- Morula Stage:
– As cell division continues, the embryo transitions into the morula stage, which is a solid ball of cells. This stage typically occurs around day 3 after fertilization.
- Blastocyst Formation:
– By day 5 or 6 after fertilization, the embryo reaches the blastocyst stage. At this point, the embryo has differentiated into two distinct cell types:
– Trophectoderm (TE): This outer layer of cells will go on to form the placenta and other supporting tissues.
– Inner cell mass (ICM): This cluster of cells is destined to become the fetus.
- Blastocoel:
– One of the defining features of the blastocyst is the presence of a fluid-filled cavity called the blastocoel. This cavity causes the blastocyst to take on a distinctive appearance with an outer layer of cells forming a thin shell around the blastocoel.
- Hatching:
– The blastocyst undergoes a process called hatching, where it breaks out of the zona pellucida, a protective layer surrounding the embryo. Hatching is essential for the blastocyst to implant into the lining of the uterus.
- Transfer to the Uterus:
– In IVF, the blastocyst is typically transferred into the woman’s uterus at this stage. By allowing the embryo to develop to the blastocyst stage, the embryologist can select a more robust embryo with a higher chance of successful implantation.
- Implantation:
– If successful, the blastocyst will implant into the uterus lining, initiating pregnancy.
The decision to transfer a blastocyst versus an earlier-stage embryo in IVF is often made based on the quality and developmental potential of the embryos. The blastocyst transfer strategy aims to mimic the natural process more closely and improve the chances of successful implantation and pregnancy.
Egg retrieval

Egg retrieval, also known as oocyte retrieval or oocyte aspiration, is a crucial step in the in vitro fertilization (IVF) process. This procedure is performed to collect mature eggs from a woman’s ovaries for fertilization in the laboratory. Here is a detailed description of the egg retrieval process in IVF:
- Ovarian Stimulation:
– Before egg retrieval, a woman undergoes ovarian stimulation using fertility medications. These medications stimulate the ovaries to produce multiple eggs, increasing the chances of successful fertilization.
- Monitoring Follicle Growth:
– Throughout the ovarian stimulation process, the woman’s progress is closely monitored through blood tests and ultrasounds. These tests help assess the growth and development of ovarian follicles, which contain the eggs.
- Triggering Ovulation:
– Once the follicles reach an optimal size, a trigger shot of human chorionic gonadotropin (hCG) is administered. This hormone mimics the natural surge of luteinizing hormone (LH) that triggers ovulation.
- Timing of Egg Retrieval:
– Egg retrieval is scheduled precisely 34 to 36 hours after the hCG trigger shot to ensure that the eggs are mature and ready for retrieval.
- Preparing for the Procedure:
– On the day of egg retrieval, the woman is typically instructed to abstain from food and drink for a few hours before the procedure. An anesthesiologist will administer anesthesia to ensure the patient is comfortable and pain-free during the process.
- Egg Retrieval Procedure:
– The actual egg retrieval is a minimally invasive procedure that takes about 20-30 minutes. The woman is positioned on an examination table, and a transvaginal ultrasound probe is inserted to visualize the ovaries.
– A thin, hollow needle is then guided through the vaginal wall and into each follicle. The needle is attached to a suction device, and the fluid from the follicles is aspirated. This fluid contains the eggs.
– The embryologist identifies and collects the eggs from the follicular fluid, which is immediately taken to the laboratory for evaluation.
- Laboratory Evaluation:
– In the laboratory, the collected eggs are examined under a microscope. Mature and viable eggs are then prepared for fertilization.
- Post-Retrieval Care:
– After the procedure, the woman is monitored for a short period to ensure her recovery from anesthesia. Some women may experience mild cramping or discomfort.
– It’s common for patients to rest for the remainder of the day, and normal activities can usually be resumed the following day.
- Fertilization and Embryo Transfer:
– Once the eggs are retrieved, they are fertilized with sperm in the laboratory. After fertilization, the resulting embryos are cultured for a few days before one or more are selected for transfer into the woman’s uterus.
Egg retrieval is a critical step in the IVF process, and its success is essential for the subsequent stages leading to a potential pregnancy. The procedure is generally safe, and complications are rare, but as with any medical intervention, there are potential risks and considerations that should be discussed with the medical team.
Hysteroscopy

Hysteroscopy is a medical procedure used in the field of reproductive medicine, including in vitro fertilization (IVF). It is a minimally invasive surgical technique that allows a doctor to examine and treat potential issues within the uterus. Here’s a detailed description of hysteroscopy in the context of IVF:
Purpose in IVF:
Hysteroscopy is often performed as part of the diagnostic workup before IVF or as a therapeutic intervention to address specific uterine issues that may affect the success of IVF. It is crucial for evaluating the uterine cavity and identifying any abnormalities that could hinder embryo implantation or pregnancy.
Procedure:
- Preparation: The procedure is usually done as an outpatient procedure, and it may be performed in a hospital or a fertility clinic. The patient is typically given a mild sedative or anesthesia to ensure comfort during the procedure.
- Insertion of the Hysteroscope: A hysteroscope is a thin, lighted tube with a camera on the end. The hysteroscope is inserted through the cervix and into the uterus. Carbon dioxide gas or a special liquid may be used to expand the uterus, allowing better visualization.
- Visualization: The camera on the hysteroscope allows the doctor to see the inside of the uterus on a monitor. This real-time visualization helps identify any abnormalities, such as polyps, fibroids, adhesions, or congenital anomalies.
- Diagnostic Hysteroscopy: If the procedure is diagnostic, the doctor will primarily observe and evaluate the uterine cavity. Any identified issues may prompt further action or inform the IVF treatment plan.
- Operative Hysteroscopy: In cases where abnormalities are detected, operative hysteroscopy may be performed during the same procedure. This involves using small instruments inserted through the hysteroscope to remove polyps, fibroids, or scar tissue.
- Post-Procedure: After the hysteroscopy, the patient is monitored for a short period in a recovery area. Most women can resume normal activities within a day, and any discomfort is typically mild.
Advantages of Hysteroscopy in IVF:
– Improved Implantation: Identifying and addressing uterine abnormalities can improve the chances of successful embryo implantation.
– Personalized Treatment: The findings from hysteroscopy may guide the fertility specialist in tailoring the IVF treatment plan to address specific uterine issues.
– Increased Success Rates: By ensuring the optimal condition of the uterine environment, hysteroscopy contributes to higher success rates in IVF.
In summary, hysteroscopy is a valuable tool in the field of IVF, offering both diagnostic and therapeutic benefits by addressing uterine abnormalities and enhancing the chances of a successful pregnancy.
Intrauterine Insemination

Intrauterine Insemination (IUI) is a fertility treatment that involves placing sperm directly into the uterus to facilitate fertilization. It is a less invasive and less expensive option compared to in vitro fertilization (IVF). IUI is often recommended for couples facing infertility due to various reasons, such as mild male factor infertility, cervical issues, or unexplained infertility.
Here is a detailed description of the Intrauterine Insemination process:
- Ovulation Monitoring:
– Before starting IUI, the woman’s menstrual cycle is closely monitored to determine the timing of ovulation. This is typically done through tracking basal body temperature, using ovulation predictor kits, or undergoing ultrasounds to monitor follicle development in the ovaries.
- Ovulation Induction (if necessary):
– In some cases, if a woman is not ovulating regularly or has irregular cycles, fertility medications like Clomiphene citrate or gonadotropins may be prescribed to stimulate the development of multiple eggs.
- Semen Collection and Preparation:
– On the day of the IUI procedure, a semen sample is collected from the male partner or a sperm donor. The sperm sample is then processed in the laboratory to concentrate the healthy and highly motile sperm.
- Washing and Processing of Sperm:
– The collected semen is “washed” to remove non-sperm components such as prostaglandins and dead sperm cells. This helps to concentrate the healthy and motile sperm, enhancing the chances of successful fertilization.
- Insemination Procedure:
– The prepared sperm sample is then introduced directly into the woman’s uterus using a thin, flexible catheter. This is typically a painless and quick procedure that can be performed in a doctor’s office. The placement of sperm into the uterus increases the number of sperm that reach the fallopian tubes, where fertilization takes place.
- Post-IUI Monitoring:
– After the insemination, the woman may be advised to rest for a short period. Some healthcare providers may recommend progesterone supplements to support the uterine lining during the early stages of pregnancy. A follow-up appointment or pregnancy test is usually scheduled to determine the success of the IUI cycle.
- Potential Side Effects and Risks:
– IUI is generally a safe and well-tolerated procedure. However, there is a slight risk of infection or injury during the process. Ovarian hyperstimulation syndrome (OHSS) is a potential complication if fertility medications are used for ovulation induction.
- Success Rates:
– Success rates for IUI vary depending on factors such as the cause of infertility, the woman’s age, and the overall health of both partners. Multiple cycles of IUI may be recommended before considering more advanced fertility treatments.
It’s important to note that the success of IUI may be influenced by various factors, and not all couples will achieve pregnancy through this method. Couples experiencing difficulties in conceiving are advised to consult with a fertility specialist who can provide personalized guidance based on their specific circumstances.
Fertilization Process

In vitro fertilization (IVF) is a complex assisted reproductive technology (ART) procedure that involves the union of an egg (oocyte) and sperm outside the body, typically in a laboratory setting. The process of fertilization in IVF consists of several key steps:
- Ovulation Induction:
– The woman undergoes hormonal stimulation to encourage the development of multiple follicles in the ovaries. Follicles are fluid-filled sacs containing eggs. Fertility medications, such as gonadotropins or follicle-stimulating hormone (FSH), are administered to stimulate the ovaries and promote the maturation of multiple eggs.
- Egg Retrieval (Oocyte Retrieval):
– When the follicles reach an appropriate size, a trigger shot of human chorionic gonadotropin (hCG) is given to induce final maturation. About 36 hours later, a minor surgical procedure called egg retrieval is performed. A thin needle is inserted through the vaginal wall and into the ovaries to aspirate the mature follicles and collect the eggs.
- Sperm Collection:
– Around the same time as egg retrieval, sperm is collected from the male partner or a sperm donor. The sperm sample is then processed to isolate healthy, motile sperm.
- Fertilization:
– The retrieved eggs and processed sperm are combined in a laboratory dish in a controlled environment. This step is often referred to as insemination. The dish is then placed in an incubator where fertilization is monitored.
- Fertilization Check:
– Typically, fertilization is assessed 16-20 hours after insemination. The embryologist examines the dish to determine if fertilization has occurred. Fertilization is confirmed by the presence of two pronuclei – one from the egg and one from the sperm.
- Embryo Culture:
– Fertilized eggs, now called embryos, are cultured in a special incubator for several days. The embryologist monitors their development and selects the healthiest embryos for transfer.
- Embryo Transfer:
– After a few days of culture, the best-quality embryos are selected for transfer into the woman’s uterus. This is typically done on day 3 or day 5 after egg retrieval.
- Luteal Phase Support:
– Hormonal medications, such as progesterone, are administered to support the uterine lining and facilitate implantation of the embryos.
- Pregnancy Test:
– About 10-14 days after the embryo transfer, a pregnancy test is conducted to determine if implantation has occurred.
It’s important to note that not all fertilized eggs result in viable embryos or successful pregnancies. The success of IVF can depend on various factors, including the age of the woman, the quality of the sperm and eggs, and the overall health of the individuals involved.
Frozen Embryo Transfer
![]()
Frozen embryo transfer (FET) is a technique used in in vitro fertilization (IVF) where embryos that were previously created during a fresh IVF cycle are frozen and stored for later use. This technique offers several advantages, including the ability to optimize the timing of the embryo transfer and to allow the woman’s body to recover from the stimulation drugs used in the initial IVF cycle. Here is a detailed description of the frozen embryo transfer process:
- Stimulation and Egg Retrieval:
– The IVF process typically begins with ovarian stimulation, where fertility medications are administered to stimulate the ovaries to produce multiple eggs.
– Once the eggs are mature, a trigger shot is given to induce the final maturation of the eggs.
– About 36 hours later, the eggs are retrieved through a minor surgical procedure known as transvaginal ultrasound-guided follicle aspiration.
- Fertilization and Embryo Culture:
– The retrieved eggs are then fertilized with sperm in the laboratory. This can be done through conventional insemination or intracytoplasmic sperm injection (ICSI), where a single sperm is injected directly into an egg.
– The fertilized eggs are monitored for several days as they develop into embryos.
- Embryo Transfer and Freezing:
– In a fresh IVF cycle, one or more healthy embryos are selected for transfer to the woman’s uterus.
– However, in a frozen embryo transfer cycle, surplus embryos of good quality are cryopreserved (frozen) for future use.
– The embryos are carefully frozen using a process called vitrification, which involves rapid cooling to prevent ice crystal formation that could damage the embryos.
- Thawing of Embryos:
– When the decision is made to proceed with a frozen embryo transfer, the selected frozen embryos are thawed in a controlled environment.
– The thawing process is crucial, as it needs to be done carefully to ensure the viability of the embryos.
- Preparing the Uterus:
– Before the embryo transfer, the woman’s uterus is prepared to receive the embryo. This may involve hormonal medications such as estrogen and progesterone to mimic the natural menstrual cycle and create an optimal uterine environment.
– Uterine lining thickness and quality are monitored through ultrasound examinations.
- Embryo Transfer:
– Once the uterine lining is deemed suitable, one or more thawed embryos are selected for transfer.
– The embryo transfer is a relatively simple and painless procedure where a thin catheter containing the embryo(s) is guided through the cervix into the uterus.
– The embryos are released, and if successful, they will hopefully implant into the uterine lining.
- Post-Transfer Monitoring:
– After the embryo transfer, the woman may be advised to take additional medications to support the early stages of pregnancy.
– A pregnancy test is typically performed a week or two after the transfer to determine if implantation has occurred.
It’s important to note that not all embryos survive the freezing and thawing process, and the success rates of frozen embryo transfer can vary. However, FET has become a common and successful technique in assisted reproductive technology.
Reproductive surgery
Reproductive surgery in the context of in vitro fertilization (IVF) refers to surgical procedures aimed at addressing anatomical or structural issues in the reproductive organs that may be hindering the natural conception process. These surgical interventions can enhance the chances of successful implantation and pregnancy for individuals or couples undergoing IVF treatment. Here are some common types of reproductive surgeries in the context of IVF:
- Laparoscopy:
– Purpose: Laparoscopic surgery involves making small incisions in the abdomen and using a thin, lighted tube (laparoscope) with a camera to visualize and access the pelvic organs.
– Indications: It is often used to treat conditions such as endometriosis, ovarian cysts, and pelvic adhesions, which can interfere with fertility.
– Procedure: Surgeons can remove endometriotic tissue, ovarian cysts, or scar tissue during laparoscopy. The minimally invasive nature of this surgery typically results in faster recovery times.
- Hysteroscopy:
– Purpose: Hysteroscopy involves the insertion of a thin, lighted tube (hysteroscope) through the cervix into the uterus to diagnose and treat issues within the uterine cavity.
– Indications: It is used to correct uterine abnormalities such as polyps, fibroids, or septum that might affect fertility.
– Procedure: Surgeons can remove polyps, fibroids, or correct uterine septum during hysteroscopy. This helps create a more favorable environment for embryo implantation.
- Tubal Ligation Reversal:
– Purpose: For individuals who have previously undergone tubal ligation (a form of permanent contraception), tubal ligation reversal can attempt to restore fertility by reconnecting the fallopian tubes.
– Indications: This procedure is suitable for those who have changed their minds about having children after undergoing tubal ligation.
– Procedure: Surgeons reconnect the fallopian tubes, allowing eggs to travel from the ovaries to the uterus, increasing the chances of natural conception.
- Myomectomy:
– Purpose: Myomectomy involves the surgical removal of uterine fibroids, which are noncancerous growths that can affect fertility.
– Indications: Fibroids can interfere with embryo implantation or cause problems with the uterine cavity, and myomectomy aims to address these issues.
– Procedure: Surgeons remove fibroids while preserving the uterus, and the procedure can be performed through open abdominal surgery, laparoscopy, or hysteroscopy, depending on the size and location of the fibroids.
Reproductive surgery is often considered when there are specific anatomical or structural issues that cannot be addressed through other fertility treatments. These surgeries aim to optimize the conditions for successful conception and improve the chances of a healthy pregnancy during IVF procedures. It’s crucial to consult with a fertility specialist to determine the most appropriate course of action based on individual circumstances.
Sperm Retrieval Techniques

Sperm retrieval techniques are procedures used in the field of in vitro fertilization (IVF) to collect sperm directly from the male reproductive system when natural ejaculation is not possible or when there are low sperm counts. These techniques are particularly useful for men with obstructive azoospermia (absence of sperm in the ejaculate due to a blockage) or non-obstructive azoospermia (low sperm production). Here are some common sperm retrieval techniques:
- Percutaneous Epididymal Sperm Aspiration (PESA):
– Procedure: In PESA, a thin needle is inserted through the scrotum directly into the epididymis, a coiled tube that stores and transports sperm.
– Collection: The needle is used to aspirate fluid from the epididymal tubules, which may contain sperm. This fluid is then examined under a microscope to identify and retrieve viable sperm.
- Testicular Sperm Aspiration (TESA):
– Procedure: TESA involves the insertion of a needle directly into the testicle to aspirate tissue containing sperm.
– Collection: Tissue samples are obtained by suction, and the retrieved material is processed in the laboratory to isolate viable sperm for use in IVF.
- Microsurgical Epididymal Sperm Aspiration (MESA):
– Procedure: MESA is a more advanced and precise version of PESA. It is performed using an operating microscope to identify and collect sperm from the epididymis through a small incision in the scrotum.
– Collection: Using microsurgical techniques allows for better visualization, resulting in a higher likelihood of obtaining healthy and motile sperm.
- Testicular Sperm Extraction (TESE):
– Procedure: TESE involves the removal of a small piece of testicular tissue through a biopsy.
– Collection: The tissue sample is then dissected in the laboratory, and viable sperm are extracted for use in IVF. This technique is often used when sperm production is low.
- Microdissection Testicular Sperm Extraction (Micro-TESE):
– Procedure: Micro-TESE is an advanced form of TESE that involves the use of an operating microscope to identify and selectively remove areas of the testicles where sperm production is most likely to occur.
– Collection: This technique aims to minimize damage to the testicular tissue and increase the chances of finding viable sperm.
After sperm retrieval, the collected sperm are evaluated in the laboratory, and the healthiest and most motile sperm are selected for use in the IVF process. The chosen sperm are then combined with the egg(s) in the laboratory to facilitate fertilization, and the resulting embryos are transferred to the woman’s uterus for implantation.